top of page

■Step1

【SIMロックの状態を確認】
-
「設定」>「一般」>「情報」で確「SIMロック」の横に「SIMロックなし」と表示されている場合、ご利用のiPhoneにSIMロックはかかっていません。
【SIMロックの解除】
-
SIMロック解除がは、現在ご利用中の通信事業者にご確認ください。
SIMロックを解除
■Step2

ご購入後、ご登録のメールアドレスにeSIM情報(アクティベーションコード)が埋め込まれたQRコードを送信致します。
このQRコードの受信をご確認ください。
QRコードの受信を確認
■Step3

【PCで受信した場合】
-
設定するスマホから、QRコードを読み込んでください。
【設定するスマホで受信した場合】
-
受信したQRコードを「写真保存」し、画像のQRコードを長押しして指示に従ってください。
QRコード情報の読み込み
■Step4
①Wi-Fiに接続

②アクティベートを許可

③準備完了。続けるをタップ

④名称選択。続けるをタップ

⑤アクティべート設定完了。

eSIM情報(アクティベーションコード)を設定
■Step5
①設定からモバイル通信をタップ

②モバイルデータ通信をタップ

③主回線にチェックがあることを確認

④戻り、キャリア表示の変更を確認
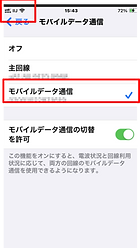
⑤お疲れ様でした。設定完了です!

iPhone端末設定
■Step4
①設定よりモバイルネットワークをタップ

②アクセスポイント名をタップ

③+ボタンをタップし、APNを新規追加

④名前・APN・ユーザー名・パスワードを入力

※APNは下記を入力
mobile-le.jp
その他は任意
⑤お疲れ様でした。保存をタップして設定完了です!
Android端末設定(プロファイル設定)

bottom of page